crafts

Reclaim Yourself Women's Craft Retreat

Could YOU use a long weekend away in a beautiful Utah valley surrounded by other crafty chicks, eating yummy foods, crafting with professionals, shopping in the adorable Swiss-inspired town of Heber, and pretty much relaxing? Who COULDN’T use one of those, am I right?

I’ll be there with a handful of current friends and another handful of future friends! Check out the Reclaim Yourself Women’s Craft Retreat blog for all the nitty gritty details, make your travel arrangements, then sign up and join us.

If you already have conflicting plans and cannot make it, come back for my synopsis afterwards. In the meantime, email the organizer (the address is on the right side of the retreat’s blog) to get on the mailing list for future date announcements. Share the link with your friends (or their loved ones who may want to gift them a retreat) who you think could use a break.

Sharing is caring!

{ Comments on this entry are closed }

Bee Mine, Valentine ~ Free

by Lucky Red Hen on February 1, 2013

beemine3_w

My cute friend at Entirely Eventful thought it’d be nifty to share the same artwork with other blogging friends to see what craftiness we’d come up with and share it with you! Lucky you, right?

Who doesn’t like getting personally written love in their postal box? NOBODY, that’s who.

Designed in Illustrator (I’m still practicing) into 4 x 6 sized post cards, these little guys want to rush through the post office system from your heart to another’s.

beemine1_w

beemine2_w

Want one? Leave a comment at the end of this post and I’ll pick someone to receive a love note from ME :) Yay!

(You guys, I hope SOMEONE wants one and comments. At least ONE person, huh?)

Want to make your own? Download the following PDF file and print to your hearts desire! It’s all ready to be sent to your favorite printer so they can lovingly (I hope they’re gentle) apply the design to a 28 x 22 white poster board as many times as you want. Then you’ll cut, round the corners if you want, add some love notes, address it, stamp it with a postcard stamp (as of today it’s just 33 cents), and stick it in the mailbox. Easy peasy, lemon squeazy!

Click here for FREE PRINTABLE


And more craftiness of this same design by other blogger friendlies… 

{ Comments on this entry are closed }

Spray Paint DON’Ts

by Lucky Red Hen on January 9, 2013

spraypaintdontsnot the charm for me, but I’m pretty sure the next time I’ll be more successful because I made ALL THE MISTAKES possible already.

Spray painting tips (borrowed from Krylon’s website; my DON’Ts are in green):

  1. Choose your location. Make sure you work in a well–ventilated area. Spray outdoors whenever possible or when using spray paint indoors, make sure the area is well-ventilated by opening doors, windows or using a fan. Avoid painting in direct sunlight and in hot, humid weather.
    DON’T: use your windowless laundry room with the door closed (so overspray doesn’t end up on the hardwood floor in the hall), even if you’re using a fan. A fan will blow all the neon green paint particles around the room and onto every surface, including your walls, tables, expensive washer and dryer, bamboo floor mat, sink surround, electric cords, linoleum floor, clothes, hair, skin, bottom of feet, white towels, dirty clothes, and stainless steel table). And the hairdryer that I thought would help speed the dry time ended up in the garbage because the vent got covered in the paint and it won’t come off.
  2. Protect from overspray. Overspray can occur both indoors and outdoors. To prevent overspray onto other surfaces, use newspapers, painter’s tape or drop cloths to cover surrounding areas. You can also create your own “spray booth” by turning a large cardboard box on its side and place objects inside when spraying.
    DON’T: think that all that plastic sheeting you taped against the wall, table, and up the sides of your paint area will hold your neon green spray paint. Those little buggers thought my “spray booth” was the entire laundry room (thank goodness I closed the door – I may have ruined my lungs but at least I protected my hardwood floors.)
  3. Prepare the surface of your project. Paint only clean, dry surfaces. Ordinary household detergents or mineral spirits are great for most surface cleaning. Glossy or hard surfaces should be sanded to improve adhesion. Use a primer whenever possible as it creates a clean, smooth surface, increases paint adhesion, seals the surface and ensures the true paint color is achieved.
    DON’T: use a bristle brush and paint stripper on a vintage metal item because those tiny flecks that hit the wall, fixtures, washer/dryer, and bamboo floor mat probably contain deadly lead paint and is a beast to get unstuck.
  4. Read all directions. Before beginning your project, thoroughly read all directions on the can. Pay particular attention to safety tips and recoat times. Always follow label directions and warnings when using any aerosol paint.
    DON’T: figure that just reading the directions means you’ve absorbed them and will follow them properly. Pay attention.
  5. Test your spray paint. Shake the can vigorously before spraying. Test your paint or spraying technique in an inconspicuous area or on a piece of scrap material before beginning your project.
    DON’T: be overambitious and skip this test. Luckily me skipping it this time didn’t ruin my project. Everything else did, but not this one.
  6. Apply multiple thin coats. Once you have completed your paint test and are satisfied, spray your project using several thin, multiple coats instead of one thick coat. Begin and finish your spray pattern off the object, releasing the button at the end of each pass. Use an even side-to-side motion with each pass overlapping your spray pattern by about one-third. For best results, always apply a coat to the entire project as opposed to completing parts of the project in stages.
    DON’T: think they’re kidding, they’re not. I’m kind of impatient and impatience equals a thick coat that dribbles like candle wax.
  7. Allow project to dry. Check the directions on the back of the can for a recoat window. A recoat window identifies when additional coats can be applied within a certain timeframe. When you are finished applying all coats, do not handle the project or surface until it is dry.
    DON’T: expect the paint gods to smile upon you and let you pick up the project so you can move it to a secret hiding spot to finish drying. Leaving your fingerprint on Santa’s gift to your child is evidence admissible in a court of North Pole law.
  8. Clean spray valve after use. Before storing your aerosol cans for future use, clean the spray valve by turning the cans upside down and spraying for 5 seconds.  This helps prevent the spray tip from clogging.
    DON’T: worry about getting to this step because, if you’re like me, you’ll run out of paint just before you’ve finished the last two inches. (By the way, cursing absolutely DOES please the paint gods because that last 2″ got barely covered… barely.)
  9. Celebrate your success. Enjoy your newly painted project. Feel good about yourself knowing that with a little work and very little money, you were able to finish your project.
    DON’T: expect too much pride or pats on the back when you’re not ever going to get credit for all that work and mess because a fat guy in a red suit that breaks into your house once a year will get all the glory.

Which reminds me of that one time I made myself a dress from scratch. ONE TIME because it was not worth it when I could get a dress at Ross on clearance for under $15. Sometimes it’s best to pay a professional to do the job right.

10. Save spray painting projects for warmer weather. This is my personal tip. Don’t spray paint indoors (unless you’re a professional with proper gear), even if you think opening a door is enough ventilation (it is not), do it outside (if in the garage, the door must be open). Even though you think you’ve protected all surrounding surfaces with plastic, you didn’t do it well enough. It’s preferred to be completely outside, in decently warm weather, where all those noxious fumes can go into the atmosphere (instead of in your lungs) and contribute to global warming with the ozone-killing can (at least that’s what the internet tells me).

I am new at the pinning of my stuff on Pinterest, so I wonder if you’d pin this post if you think the tips would be helpful to others? Thanks!

{ Comments on this entry are closed }

Doing Good Deeds

by Lucky Red Hen on December 21, 2012

orbs_6

Can I tell you about the night I had?

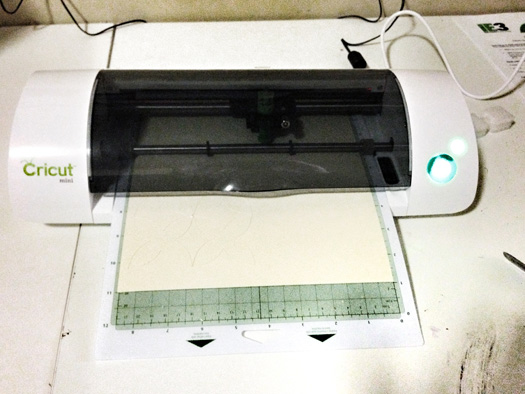
It started out as an informal demonstration of how to use the new Cricut Mini cutting machine at the Provo Craft office with a few bloggers and Nathan, the PC social media manager.

orbs_2

As we were being schooled on manipulating one of the thousands of designs (bigger, smaller, mirrored, weld, omit parts, etc.) we got word that help was needed to create decor for the upcoming funeral of little Emilie Parker, one of the victims of the tragic Sandy Hook Elementary shooting in Connecticut.

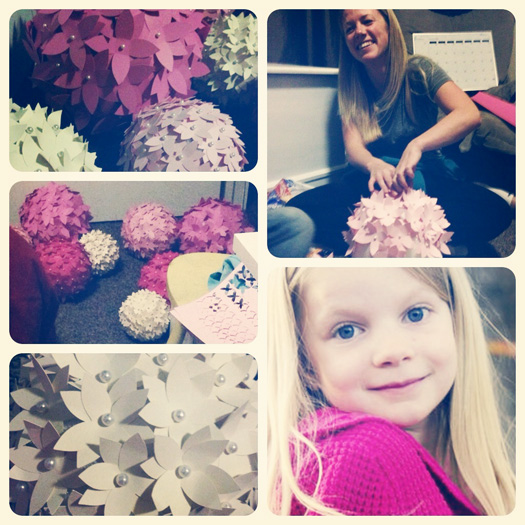
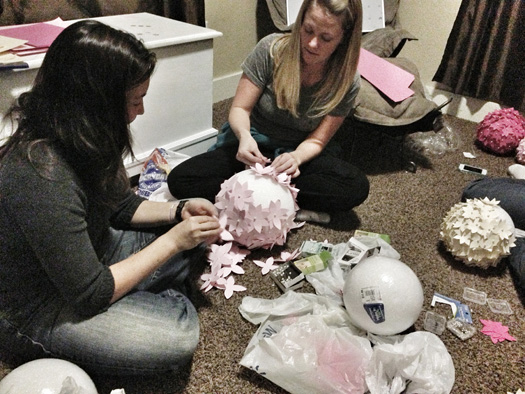
Nathan jumped into action providing us with several Cricut machines, matts, tools, and artwork so we could assemble as many decorative hanging balls before the building lights went out at 9:30 p.m.

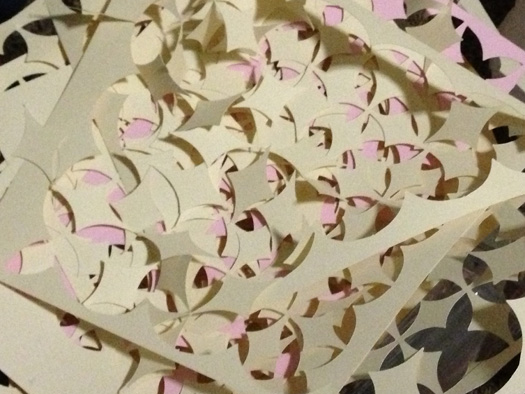
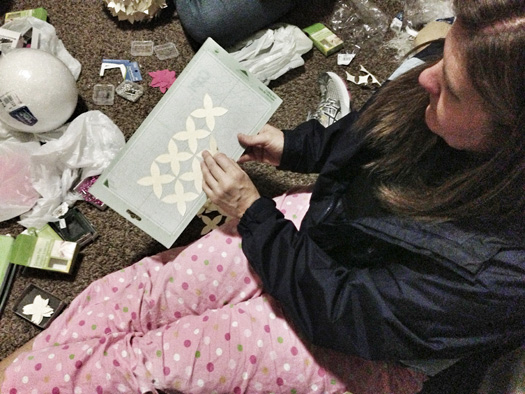
If you want to get familiar with a new-to-you machine, busting out 5,000 cut flowers in a few hours will do that. We learned how to tell if a blade needs to be replaced (snags the material you’re cutting), the tension needs adjusting (a little more if the paper slips), or the blade depth isn’t deep enough (your cut pieces don’t come easily apart from the material you’re using).

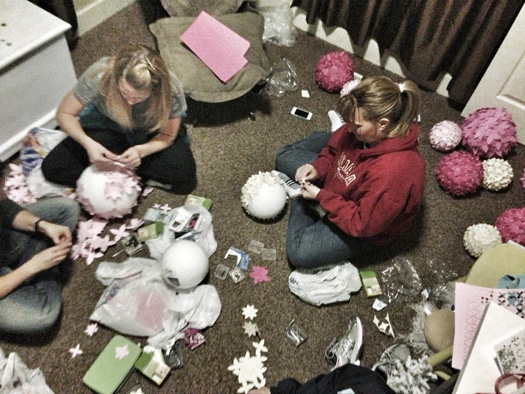
After the lights went out, we cleaned up our paper mess (I wrote “I elephant Cricut” on the white board) and hauled the supplies over to Cobi’s house to finish the assembly (and some more cutting – those poor blades and cutting matts are trashed after so many cuts in the same spot over and over). A few more ladies joined us there until almost 2 a.m. so we could finish.

orbs_5
orbs_4
orbs_3

One of the ladies is related to little Emilie. As we worked together, she shared little bit about the family (Emilie was the oldest of three kids; children process death differently than adults and each other), their faith in Jesus Christ (Emilie’s grandfather, to whom she was very close, died recently from a freak accident; the belief that they are together in heaven is comforting to those still here), and how the chaos of that fateful day unfolded (waiting hours for confirmation of the whereabouts of their daughter).

I am grateful for the network of bloggers I am involved with and the amazing companies that show they care about their customers. Not only did Provo Craft bend over backwards to support the Parker family and those of us who wanted to help, but the kind manager at Hobby Lobby authorized a sweet discount for the supplies (pins, paper, styrofoam balls, ribbon).

We hear all the time about negative experiences with products/services and companies, so if you like the idea of supporting positive experiences with your voice or pocket book, consider dropping a tweet, email, Facebook comment, purchase, or compliment to Provo Craft, Cricut, and Hobby Lobby soon.

By the way, after purchasing and assembling the decorations, we estimate it cost about $20 each (retail) to recreate these pretty hanging flower orbs. If you have a lot of the supplies already, you could do them for much less.

Happy crafting!

orbs_1

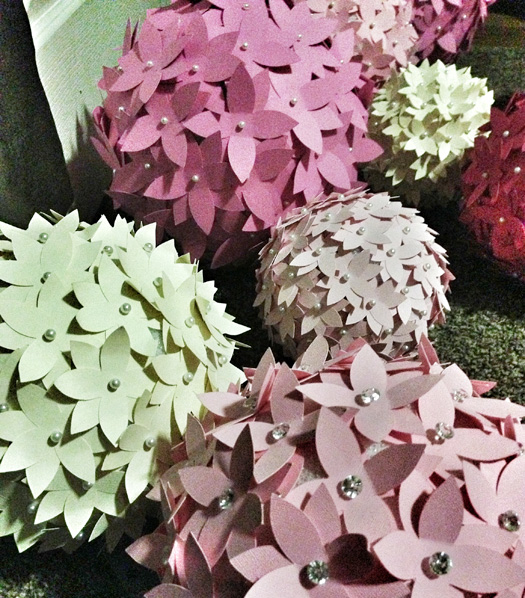
INSTRUCTIONS TO MAKE PAPER FLOWER ORBS

  • Orbs (like styrofoam or green flower foam balls)
  • Card stock in your preferred color
  • Cutting machine/punch (Cricut)
  • Pins (with a decorative head would be prettiest)
  • A lot of time
  • Ribbon
  • Long dowel, knitting needle, or something to push
  • ribbon through the orb so it can hang
  • (Optional: paint the orb the same color as the
  • card stock to avoid seeing foam between the flowers)
  1. Cut 1-3″ flowers enough to cover orb twice
  2. Stick pin through the middle of two flowers
  3. With your fingers/thumb, rub the top flower
    petal upwards to create a soft bend
  4. Stick the pin all the way into the orb, flush
    with the bottom petal
  5. Continue #4 overlapping slightly with the
    nearest flower so the orb isn’t visible until
    the entire orb is covered
  6. Push your desired length of ribbon through
    the middle of the orb out the bottom and
    double knot the end so it stays in place
    (like you would the end of a hoodie string
    so it doesn’t slip back up into the pocket)
  7. Hang and admire

orbs_7

{ Comments on this entry are closed }

Giant Map Wall: DIY

by Lucky Red Hen on April 17, 2012

Had a hankerin’ for a giant map on my office wall that we can mark (with pins) places we’ve been, places, we’d like to be, and friends/family we love. Also, I suck at geography, so having this close to my face might make me smarter (maybe even by osmosis?)

Bought the giant map at a map store (20% sale for under $20), the foam core ($15) at xpedx (so happy to be near an xpedx again), the plastic sucker things at Home Depot (about $6), and I had the spray adhesive on hand.

Imagined the map framed, but the quote, at 50% off – what a crock, was over $200 (which is NOT a bad price for that large a piece; I don’t mind paying for good quality framing; but I don’t have that much right now and wanted my map hung pronto). The next best thing is to mount it to the wall frame-less and enjoy it until I have some pocket money to frame it proper.

Here are some pics of the before/after and process:

Before: that framed print is temporary, bought it for the frame at a charity yard sale

Lazy, not dead, dog. Clamped half the map down and sprayed the other half first to keep it in place. Then took off the clamps (binder clips and clamps with something between so it didn't crease the map), then sprayed the other half.

Lazy, not dead, dog, moved lounge spots. Tall, long-armed husband helped hold and press the map as I sprayed. That's a cheap plastic liner we bought in a roll at Home Depot years ago during a remodel on another house. Even though we held up the plastic to help catch the spray adhesive, some still got on the wood floor. But doing this outside wasn't an option and I'm not patient enough to wait until we could. The garage was too cold (which could interfere with the adhesion).

The foam core is about 1/4" thick. Enough space to stick a pin into it and hold it in place.

These are a fairly new product that's supposed to provide temporary hanging that's still strong. I was skeptical, but the Home Depot guy said I could bring them back if I'm dissatisfied; I'm not. These little guys work GREAT! They also make it so I could take the map down and reattach if I wanted to. I don't know why I would, but it's an option.

Here's the end result. It looks kinda small to me now. I either want it bigger or I need to paint the walls to help it not be so small. I'm thinking of a blue/gray color. Might even slap up a frame around the map directly to the wall and call it good (which would just be moulding, I could even attach them with the same sucker thingys).

Seeing the end result reminds me that I wanted to paint the desk. It was left by our rentors and it too heavy to carry out of there easily. So I stuck my old door with glass top on it (took off it’s wooden top and am using it downstairs as a make shift table top) and decided to keep it (with the intent of repainting it eventually).

I’m thinking of a distressed cream, or perhaps a turquoise like the map.

{ Comments on this entry are closed }

STOP IT : Gossiping (Lying)

by Lucky Red Hen on April 2, 2012

Lying sucks. Add gossiping to that and you get nothing but a bowl full of nasty.

It’s no surprise that people talk about me/you behind my/your back. This isn’t news. I’m actually used to it. Not that I like it, but I’ve accepted the fact that it will/does happen, and I cannot change it so why get bent out of shape about it. (If only someone would invent a remote control that will MUTE gossipers.)

A thread on Facebook that started with “So here’s the deal… DON’T LIE TO ME!” was a trigger to write this post. Here are comments from it:

  • Lying is the ONE thing that EVERYONE has control over. When you lie you make a conscience decision to do it… and for some it comes naturally.
  • Why is NOT lying so stinkin’ difficult for so many people?
  • I will never put up with that again… from anyone! One of my biggest pet peeves too.
  • A lie is one of the worst things you can ever do to degrade yourself; it is one of the most difficult things to undo. You may be in trouble for telling the truth, but to lie makes things twice as bad. Tell the truth, take your punishment and live with your choices!
  • Lying shows a persons weak character, what they lie about shows their heart!
  • You know some folks just don’t get it. Delete from your life. Don’t waste your time with them.
  • Some people don’t lie just to get out of trouble and lots of times the truth wouldn’t even mean punishment. Making up a story to make you look better to the world, ugh! Then there’s lying by omission, just NOT telling. JUST TELL THE TRUTH!
  • People who, in general, walk in truth live an easier life because they would not do something they would have to lie about later.

That last comment is me to a tee. My memory is kinda horrible. Having to remember what I lied about to not get caught is impossible for me so I tell the truth. Well, I tell the truth because that’s the right thing to do (even if I had a good memory).

Another trigger was an unexpected text exchange yesterday with a friend…
Buddy:  He’s in deep trouble with a lot of people. He has not been good about telling the truth. Truth is important to me.
Me:  Dude, you’re preaching to the choir!
Buddy:  That is what I love about you. Could tell from day one. Your word is WORD.

I’m glad people recognize that in me, if nothing else. The trick is when I find out someone, especially someone close to me (who really, REALLY knows better), has lied to me. And if you BOLD FACE lie to me after I’ve specifically asked you up front…

Maybe it’s that I find it hard to forgive
the follies and vices of others,
or their offenses against me.
My good opinion, once lost,
is lost forever. – Mr. Darcy

Yesterday’s LDS General Conference had a poignant talk by Dieter F. Uchtdorf that I’ve already reread, and it’s made me ponder what I should do when I find out I’ve been crossed, lied to, gossiped and talked negatively about behind my back. Just be honest with me and we’ll get along swimmingly.

I created this artwork based on President Uchtdorf’s message:

I adhere to the lesson, “Burn me once, shame on you. Burn me twice, shame on me.” I don’t have a problem with forgiving. We are imperfect people, we (I) make mistakes, but that doesn’t mean I’m going to stick around to keep getting burned.

Sometimes we have to look at friendships/relationships with people and say, “That was good while it lasted, it served its purpose. Now we move on to other life experiences.” They could be FABULOUS people, full of joy, love, honesty, and whatever else. Just because we no longer maintain a relationship doesn’t mean either of us are bad or something went wrong. Maybe that one is done to make room for the next.

{ Comments on this entry are closed }

My Lifeguard Walks On Water

by Lucky Red Hen on March 12, 2012

Santa gifted me an online Illustrator 101 class. You know, the kind that’s just a video series you follow along to and turn in homework once a week for the teacher to critique.

I figured that would be a handy way to learn without the commitment of having to drive somewhere, park, and set aside a certain time every week. Going at my own pace seemed like a handy way to manage my time.

Instead, it’s kinda turned out to be irritating because of my recent Russian worm virus (or, with a Russian accent, I like to pronounce it Russian verm) that struck my main computer, a PC.

Switching from a PC to a Mac is a long time coming, yes. Being forced to change is stressful enough and adding instruction on a new-to-me program threw me into a tailspin. Luckily, the teacher sympathized with my plight and transferred my scheduled class to the next one, giving me some time to adjust to the wonders of Macdom.

Our first week explained the basics, mixed with some magical tricks only Illustrator can do. She encouraged us to peruse Etsy for ‘poster typography’ examples and create something utilizing what we’ve learned. I had seen the following words on a picture on Pinterest and came up with the design on my own (with plenty of mistakes, redo’s, start over’s, and jimmy-rigging to do what I wanted)…

A graphic designer friend nicely told me I did a great job (thanks, Joel!), knowing that I’m new at this and have NO design background. I’m excited to learn more and hope I get more natural with the design process so it doesn’t frustrate me so much. With so many ideas in my head, it’d be cool to figure out a way to get them on paper (or in a digital file, haha).

Practice makes closer to perfect so I’ll keep plugging along :)

P.S. Do you get that the lifeguard is Jesus? Is that implied or do you go ??? at the end?

{ Comments on this entry are closed }

IKEA Knife Magnet

by Lucky Red Hen on February 29, 2012

Posting this from my phone because I a) was just in the kitchen cutting pita bread for my basil laden hummus, and b) I’m fighting with my computers right now.

I LURV my new IKEA knife magnet instead of the knife block. It takes up less counter space (need a little empty space in front of them), is about $9, you can see exactly what you’re getting (instead of pulling knives out to figure out which one’s which), and it’s like magic!

20120229-150407.jpg

My hummus recipe in food processor:
2 cans garbanzo beans, mostly drained
fresh basil (or from the tube)
3+ garlic cloves, minced with press
fresh 1/2 lemon juice plus zest
salt & pepper to taste
olive oil to desired consistency
Refrigerate

20120229-150420.jpg

I could’ve taken a more appetizing photo of my hummus, but I didn’t. It’s good. WAY good.

{ Comments on this entry are closed }